Ethan Crowder
- Published Books & Articles
- Hydrogen Fracturing Process Book
- Laser Distributor Analysis Article
- WFC Memo 432-DA Electronic Circuits Analysis
- VIC PCB Circuit Analysis
- STLs ; Gcodes ; .STEP Files
- 3" Gas Resonant Cavity (aka Hydrogen Gas Gun)
- 9 Resonant Cavity Cell (.STEP files)
- Long Tube Cells For Testing (STL files)
- Coil Winding Machine (STL files)
- Wire Straightener & Length Measuring Machine (STL files)
- EPG (STL files)
- Steam Resonator
- YouTube Videos
- PCB Gerber Files
- Steam Resonator (Memo WFC 423-DA)
- CD4046 (Phase Lock Loop) Based Gated Frequency Generator
- PC9XB - Variable Pulse Frequency Generator
- PC9XC - Variable Gate Circuit
- PC9XE - Sequential Gate Circuit
- EPG - Magnetic Spin
- Replications
Published Books & Articles
Hydrogen Fracturing Process Book
This work is copyrighted material. However, it may be distributed for free (without profit) IF kept in it's original format, without any modifications and no monetary profit is gained.
Free PDF download: HFF Copyrighted Release_2-3-25.pdf
Laser Distributor Analysis Article
This article is copyrighted. However, it may be freely shared IF KEPT IN THE ORIGINAL FORMAT AND NO MONETARY PROFIT IS PURSUED.
Dual Laser Distributor Analysis Article: Dual Laser Distributor Replication & Analysis.pdf
WFC Memo 432-DA Electronic Circuits Analysis
Coming in the future
VIC PCB Circuit Analysis
Sorry to tease, but it'll be coming in 2026, promise :)
STLs ; Gcodes ; .STEP Files
I've provided extensive CAD dimensions of replications from photographic analysis of estate photographs. This is a master listing of freely available STLs, Gcodes and .STEP files formats. For those who may not know, .STEP files are for CNC machining. I personally use PCBWay, if anyone is interested. This will be updated when I design and release more.
3" Gas Resonant Cavity (aka Hydrogen Gas Gun)
The design is centered around market available semi-clear 3" PVC pipe. As of 12-7-25, I've not have CNC machined versions. Until I get around to that, please only focus on the below given STLs.
Coming Soon
9 Resonant Cavity Cell (.STEP files)
Semi-clear PVC pipe (USA - Ebay distributor): Semi-Clear PVC Pipe
Main Cell Body: Main Body-NineResonantCavity_12-31-25.step
Electrode Cap: ElectrodeCap-NineResonantCavity_12-31-25.step
Top Plate: TopPlate-NineResonantCavity_12-31-25.step
Bottom Plate: BottomPlate-NineResonantCavity_12-31-25.step
4 Inch Milled Inner Electrode: InnerElectrode-NineResonantCavity_12-31-25.step
Complete Assembly:
Long Tube Cells For Testing (STL files)
Coming Soon
Coil Winding Machine (STL files)
Coming Soon
Wire Straightener & Length Measuring Machine (STL files)
Coming soon.
EPG (STL files)
Coming Soon
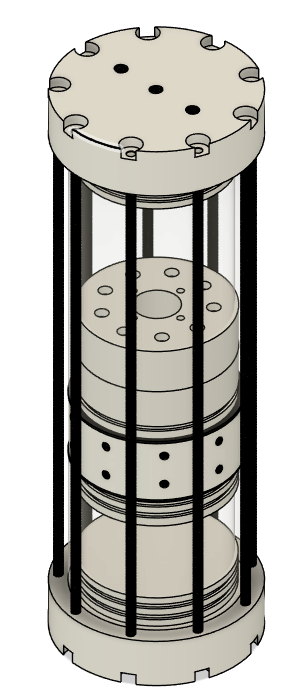
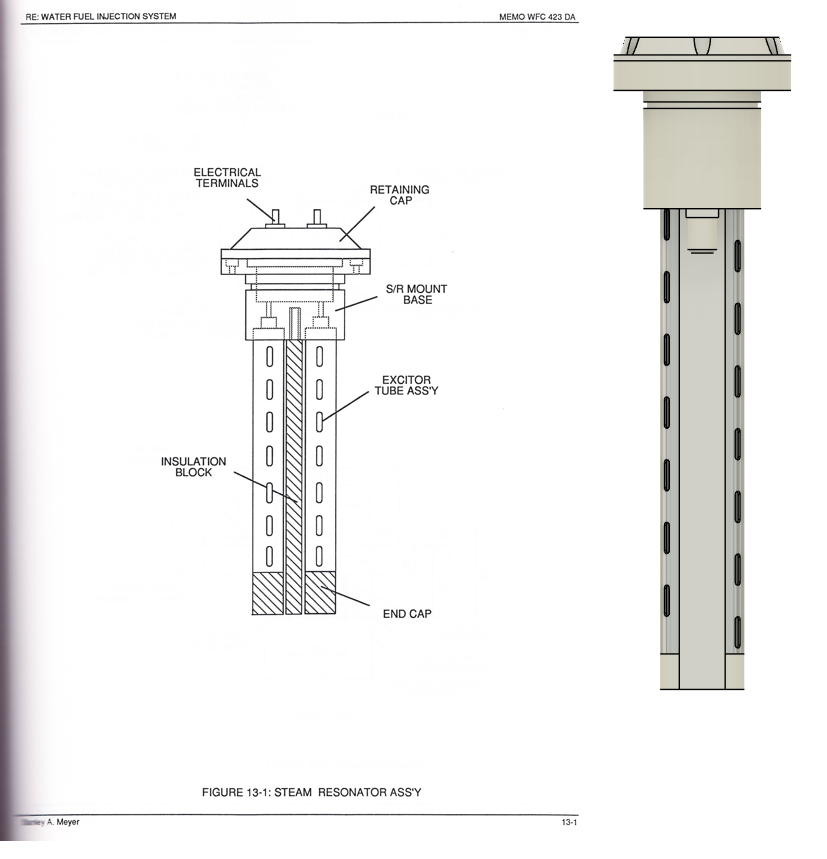
Steam Resonator
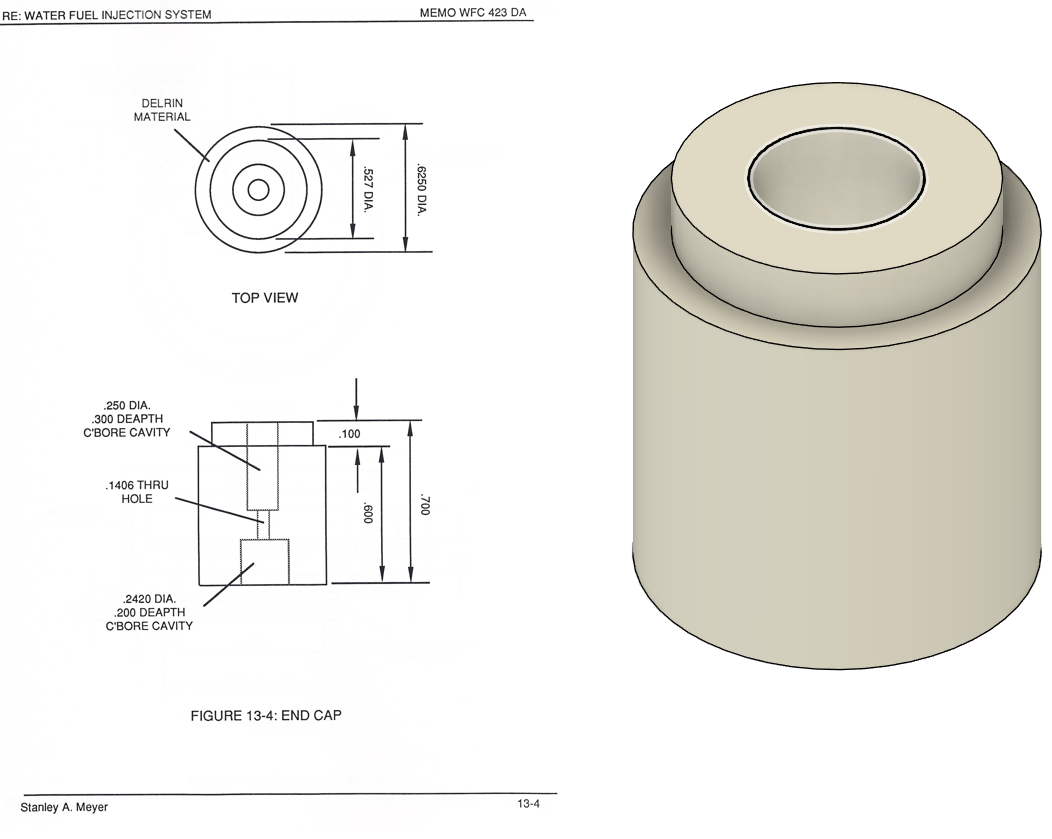
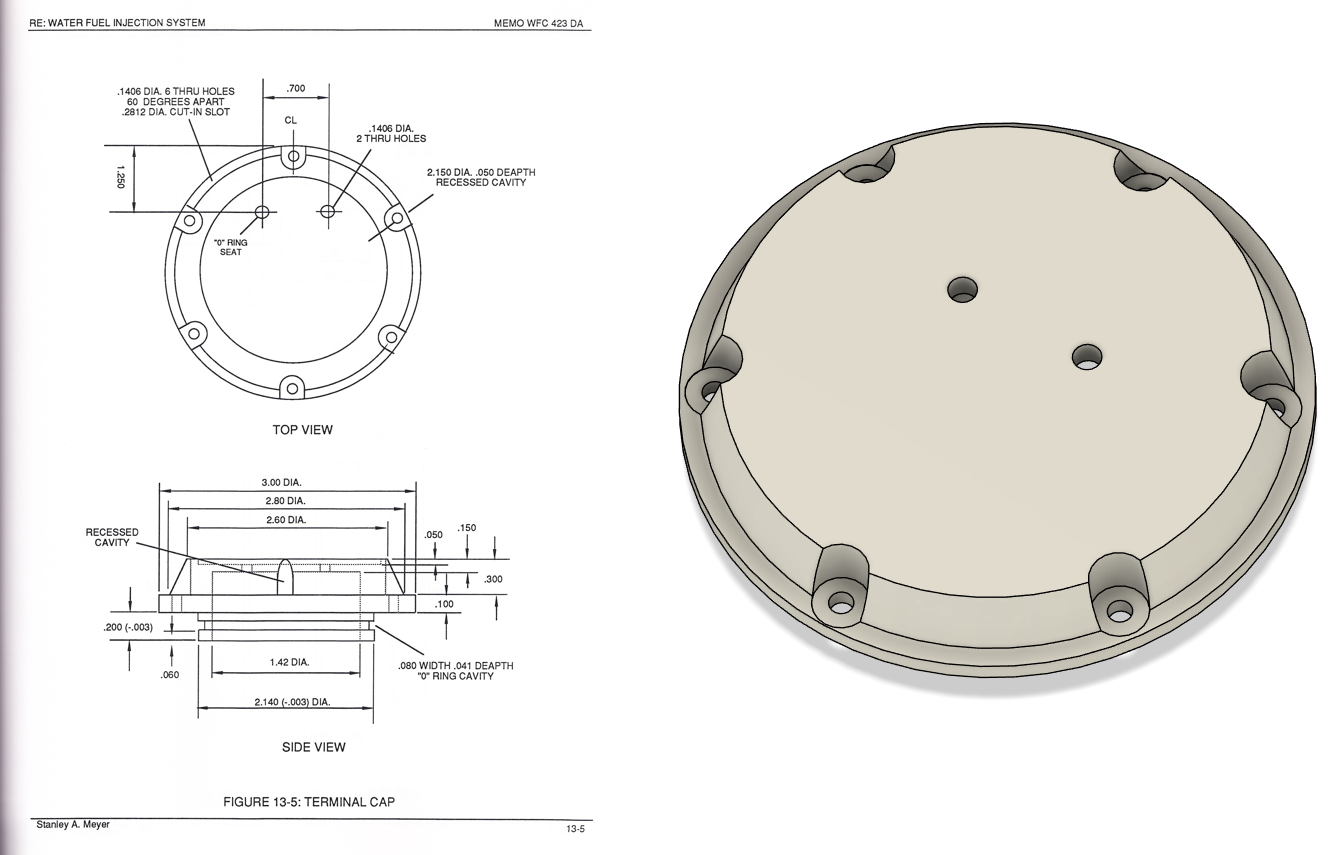
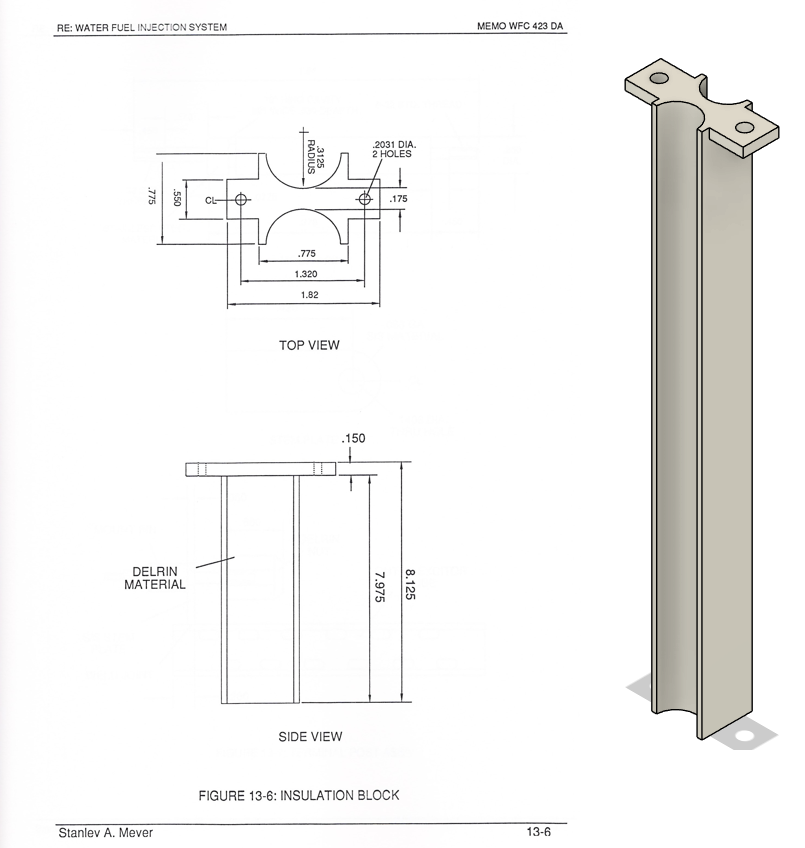
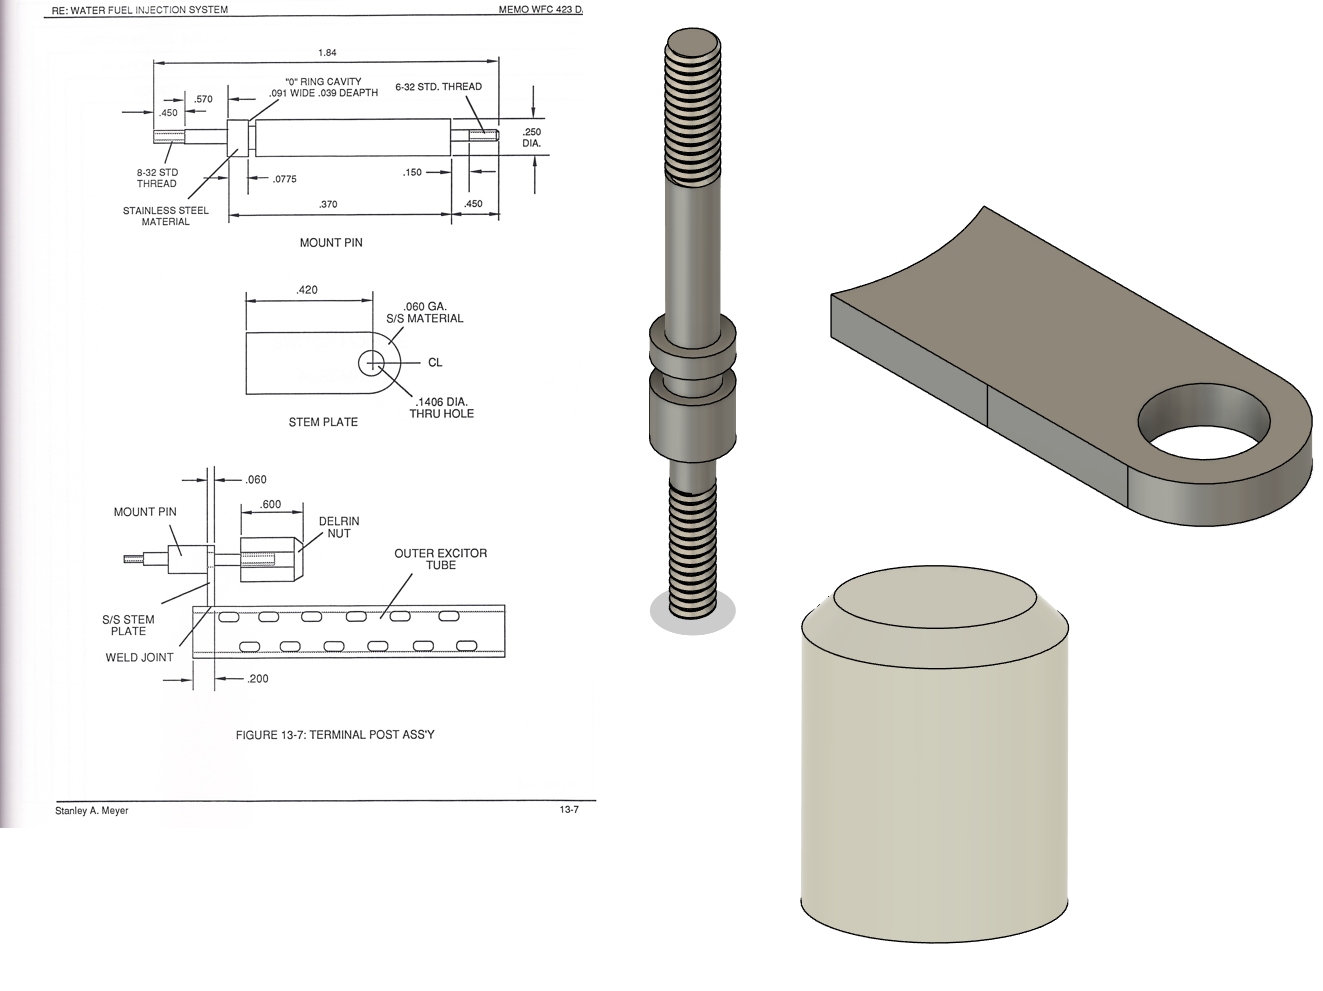
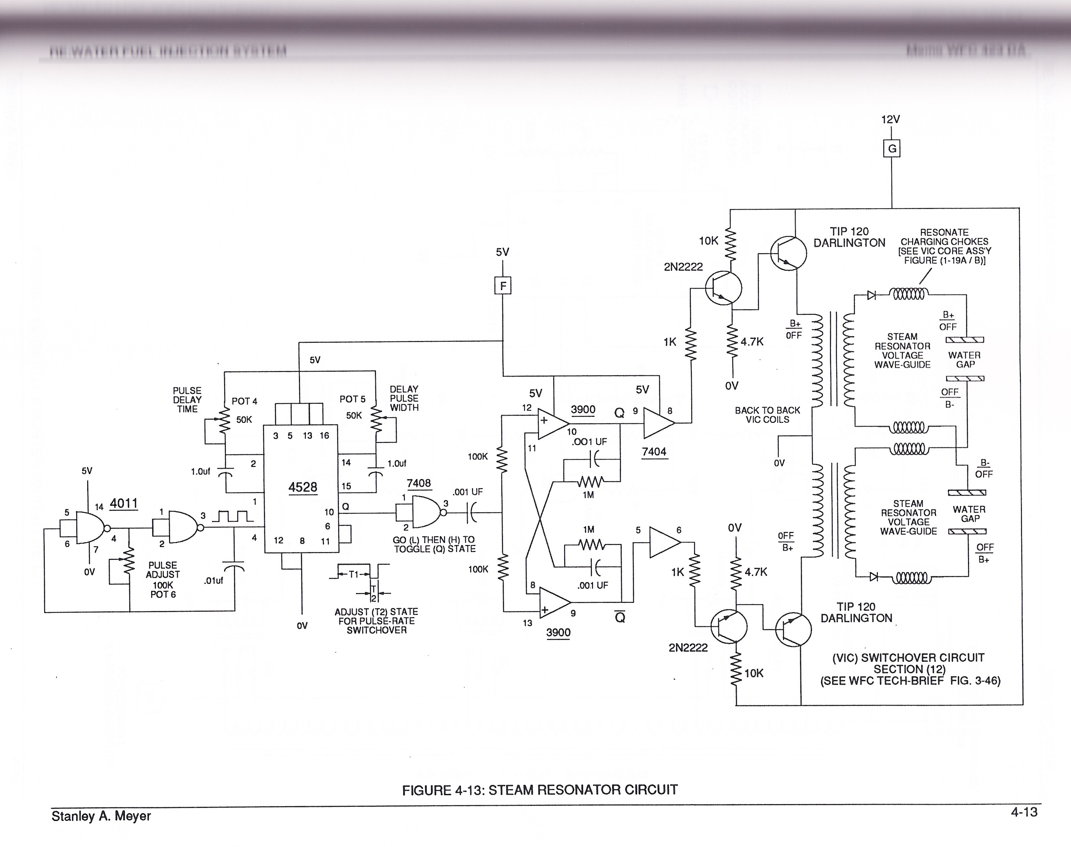
The following .STEP and STL files are from Memo WFC 423-DA. The .STEP files have been provided for CNC machining. STLs are for 3D printing. Discrepancies were found with Stan's original dimensions. A 3D printed model was built and the .STEP files were modified to reflect the corrected dimensions.
NOTE FROM ETHAN CROWDER: I've used PCBWay's CNC machining services without any issue. Our group is not affiliated with them, nor do we receive any sponsorships for mentioning them. I've provided these for free so anyone in the world with the resources can have the electrodes made. Gerber files for the PCB are provided as a link below.
There are certain individuals that have a habit of taking other's work and claiming it as their own. While I won't name them here, please understand that the .STEP and STL files will probably show up on other websites, possibly for purchasing. The files provided here are FREE OF CHARGE. The original Memo WFC 423 DA diagrams are included for clarity.
PCB Gerber Link: Steam Resonator PCB Gerbers
STL FILES
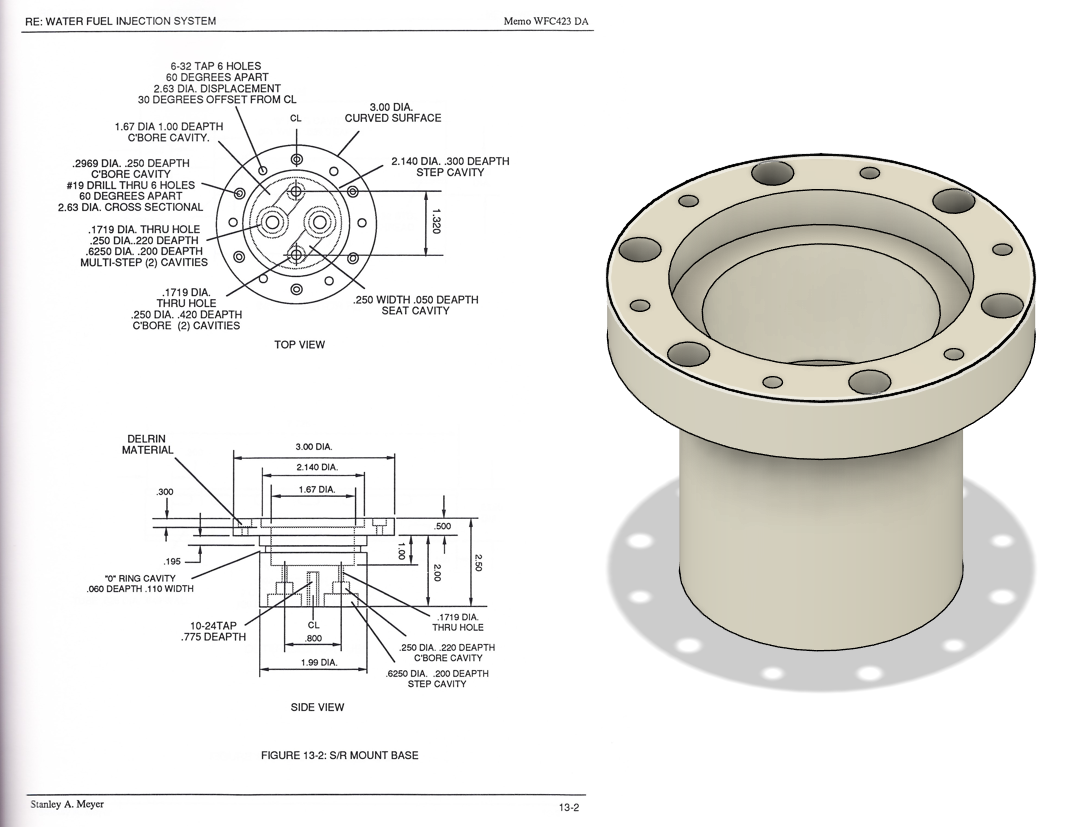
Steam Resonator S/R Mount Base: SRMountBlock-SteamResonator_12-31-25.stl
Steam Resonator Insulation Block: InsulationBlock-SteamResonator_12-31-25.stl
Steam Resonator End Cap: EndCap-SteamResonator_12-31-25.stl
Steam Resonator Terminal Cap: TerminalCap-SteamResonator_12-31-25.stl
Steam Resonator Delrin Nut: DelrinNut-SteamResonator_12-31-25.stl
.STEP FILES
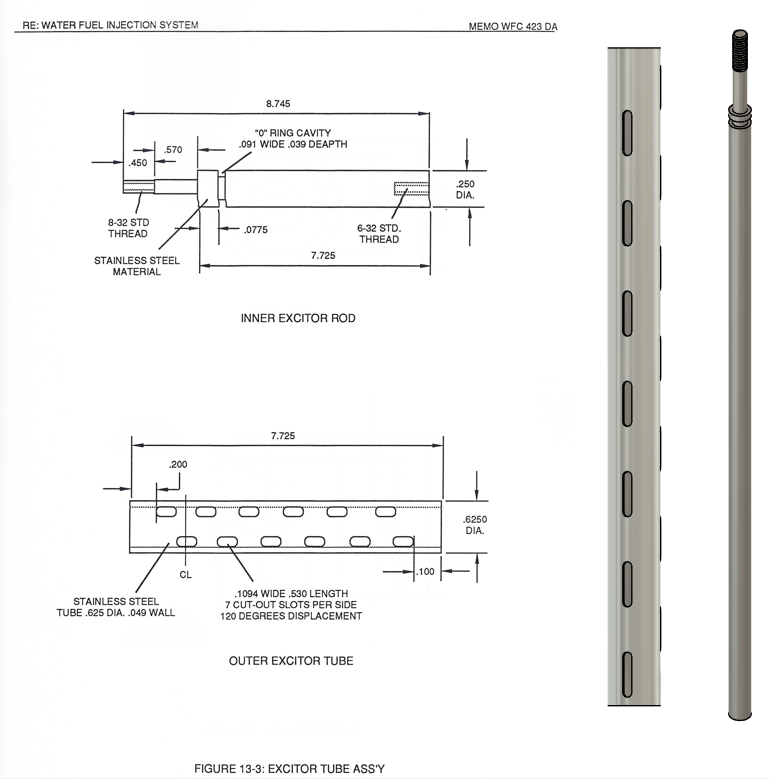
Steam Resonator Inner Excitor Rod: InnerExcitorRod-SteamResonator_12-31-25.step
Steam Resonator Outer Excitor Tube: OuterExcitorTube-SteamResonator_12-31-25.step
Steam Resonator S/R Mount Base: SRMountBlock-SteamResonator_12-31-25.step
Steam Resonator Terminal Cap: TerminalCap-SteamResonator_12-31-25.step
Steam Resonator End Cap: EndCap-SteamResonator_12-31-25.step
Steam Resonator Mount Pin: MountPin-SteamResonator_12-31-25.step
Steam Resonator Stem Plate: StemPlate-SteamResonator_12-31-25.step
Steam Resonator Insulation Block: InsulationBlock-SteamResonator_12-31-25.step
Steam Resonator Delrin Nut: DelrinNut-SteamResonator_12-31-25.step
WFC 423-DA DIAGRAMS:
YouTube Videos
Master YouTube video links. Organized by category.
Resonant Cavities Testing
Coming in the future
Circuitry Analysis
Coming in the future
PCB Gerber Files
All Gerber files for the replica PCB designs.
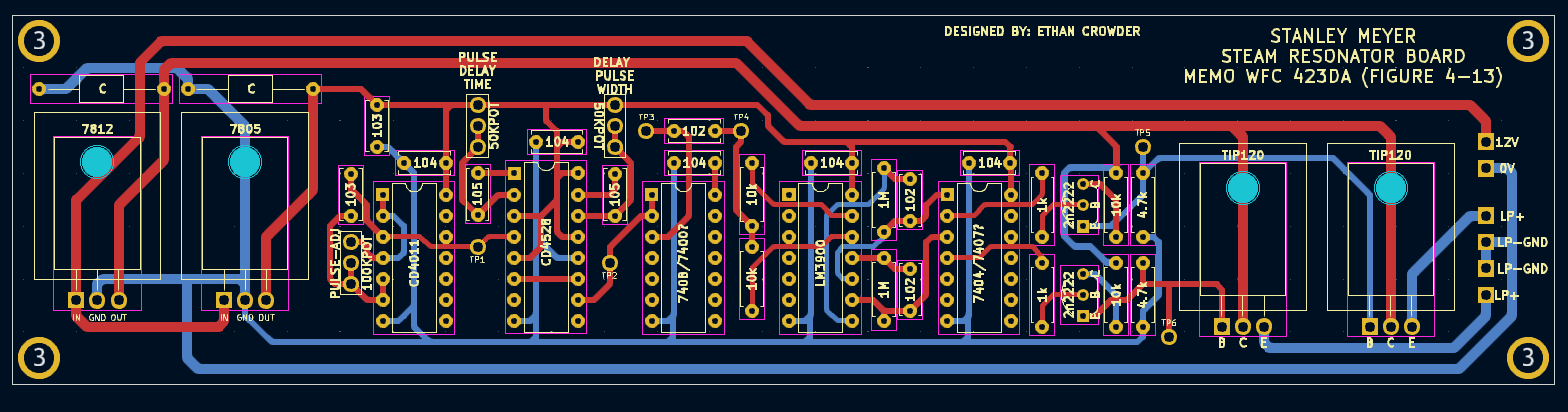
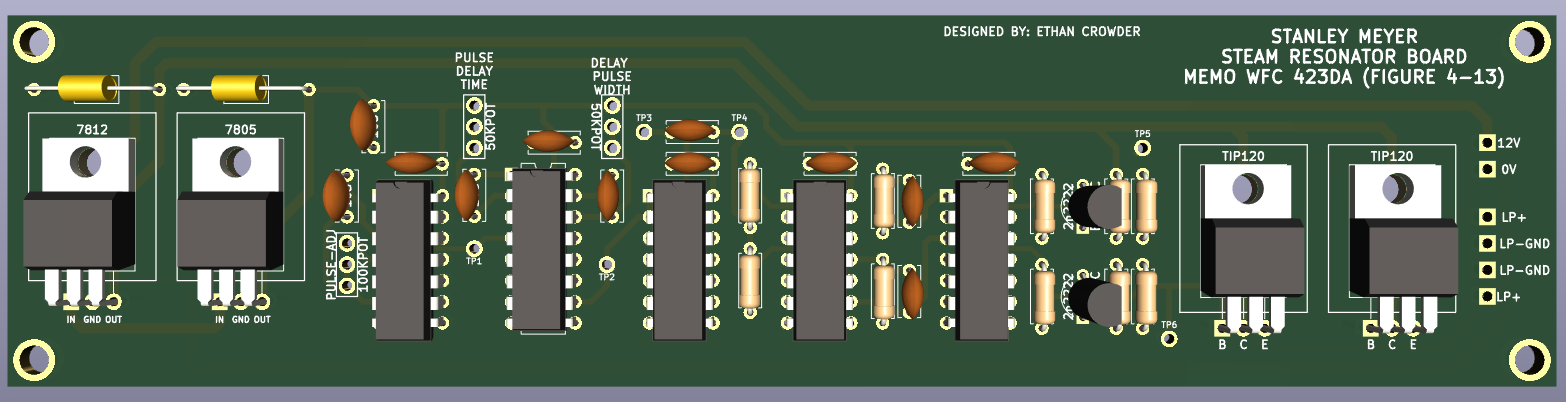
Steam Resonator (Memo WFC 423-DA)
The PCB replica is provided below. All components are through-hole (THT) in this revision. Unfortunately, the winding ratios aren't provided in the WFC 423-DA. Experimentation will be required.
A circuit analysis document will be coming a later date.
PCB Gerber Zip File: Steam Resonator PCB Gerbers_12-31-25.zip
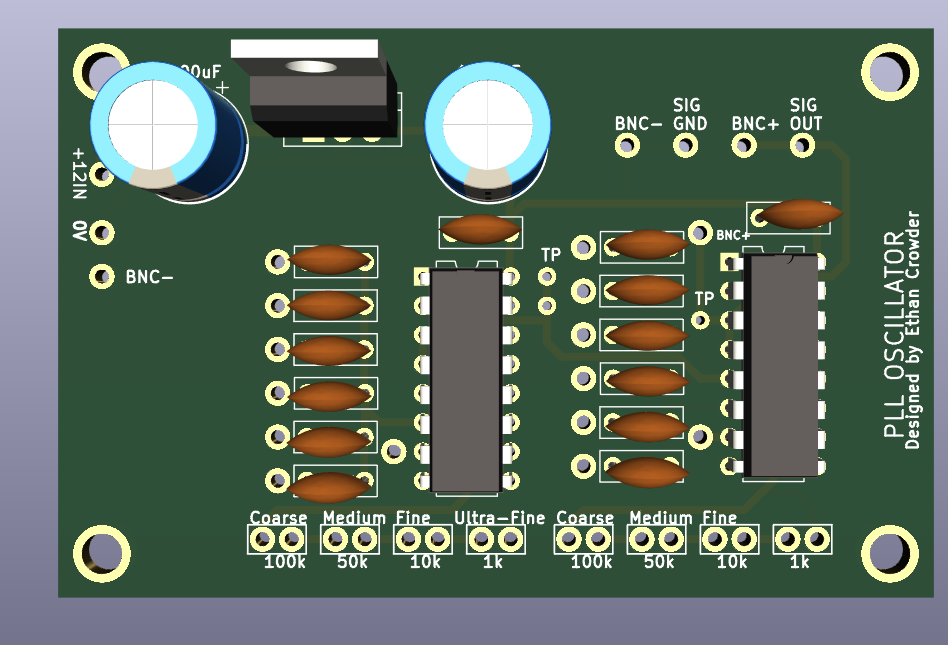
CD4046 (Phase Lock Loop) Based Gated Frequency Generator
NOTE FROM ETHAN CROWDER: This is a simple square wave oscillator, with close to a fixed 50% duty cycle, that utilizes two CD4046 Phase Lock Loop ICs. Four potentiometer connections have been included for each IC, that allows very precise frequency control. I've use four 10-Turn precision potentiometers. The CD4046's are supplied 12V. This was chosen for easier integration with more modern N-CH MOSFETS, which typically require a gate voltage of 10V minimum for full turn on.
PCB Gerber .ZIP Folder: PLL Gated Frequency Generator Gerbers.zip

PC9XB - Variable Pulse Frequency Generator
PCB Gerber .ZIP File:
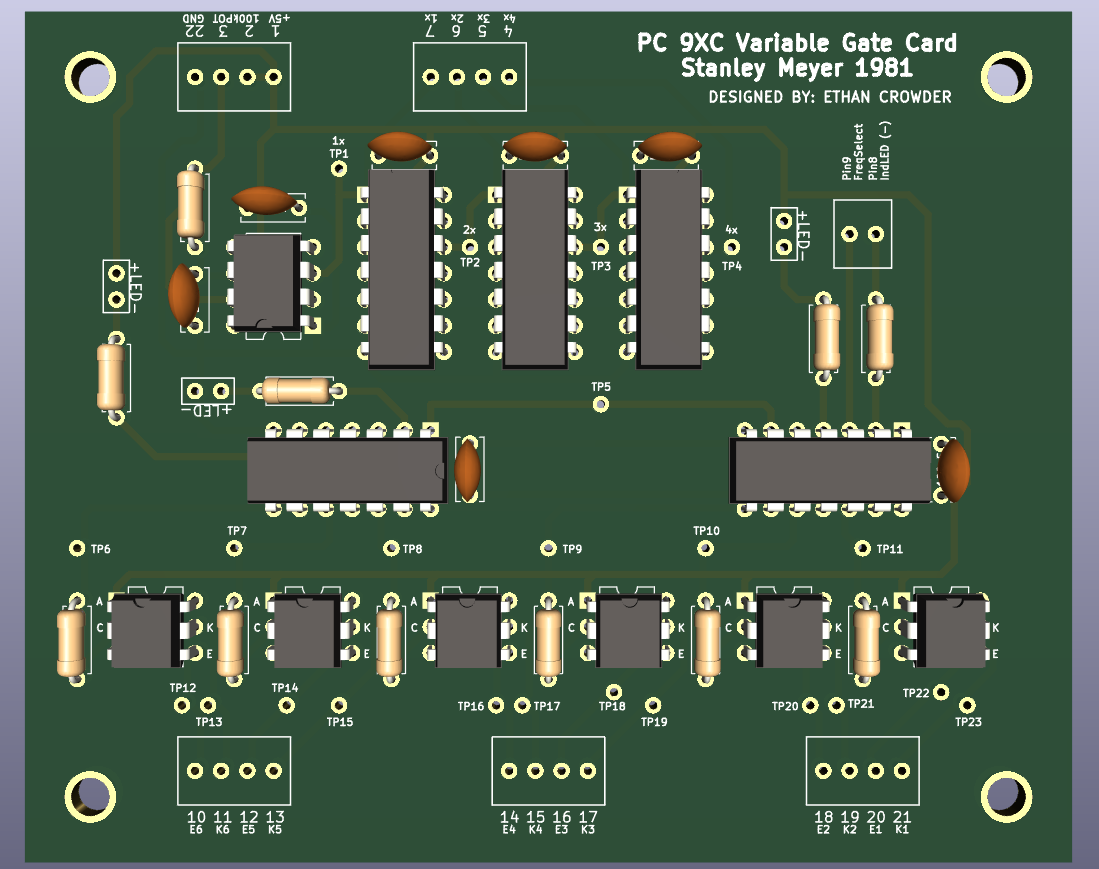
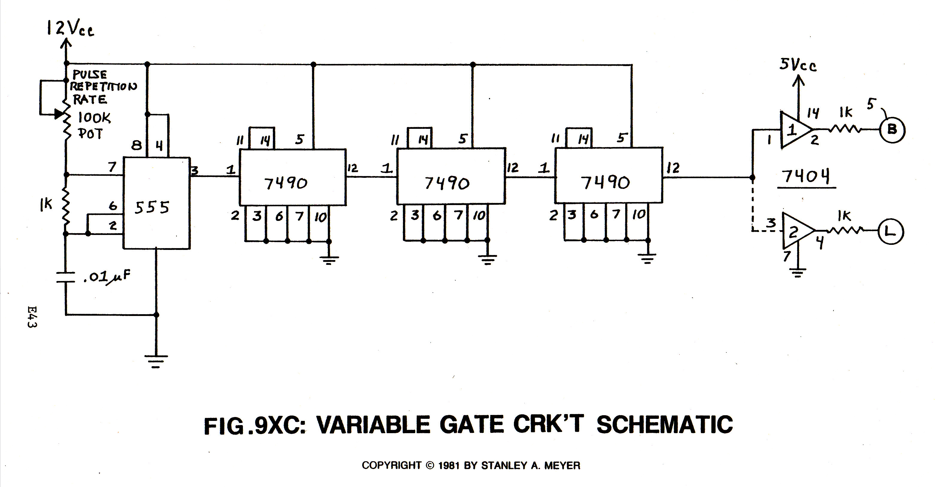
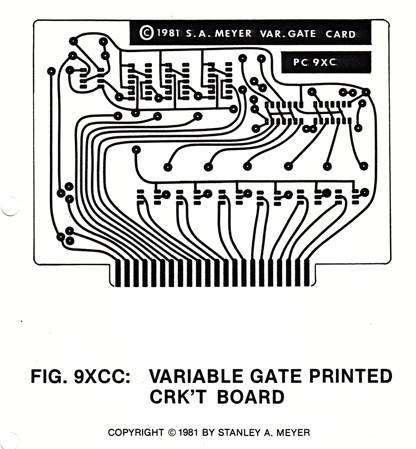
PC9XC - Variable Gate Circuit
PCB Gerber .ZIP File: PC9XC Gerbers.zip
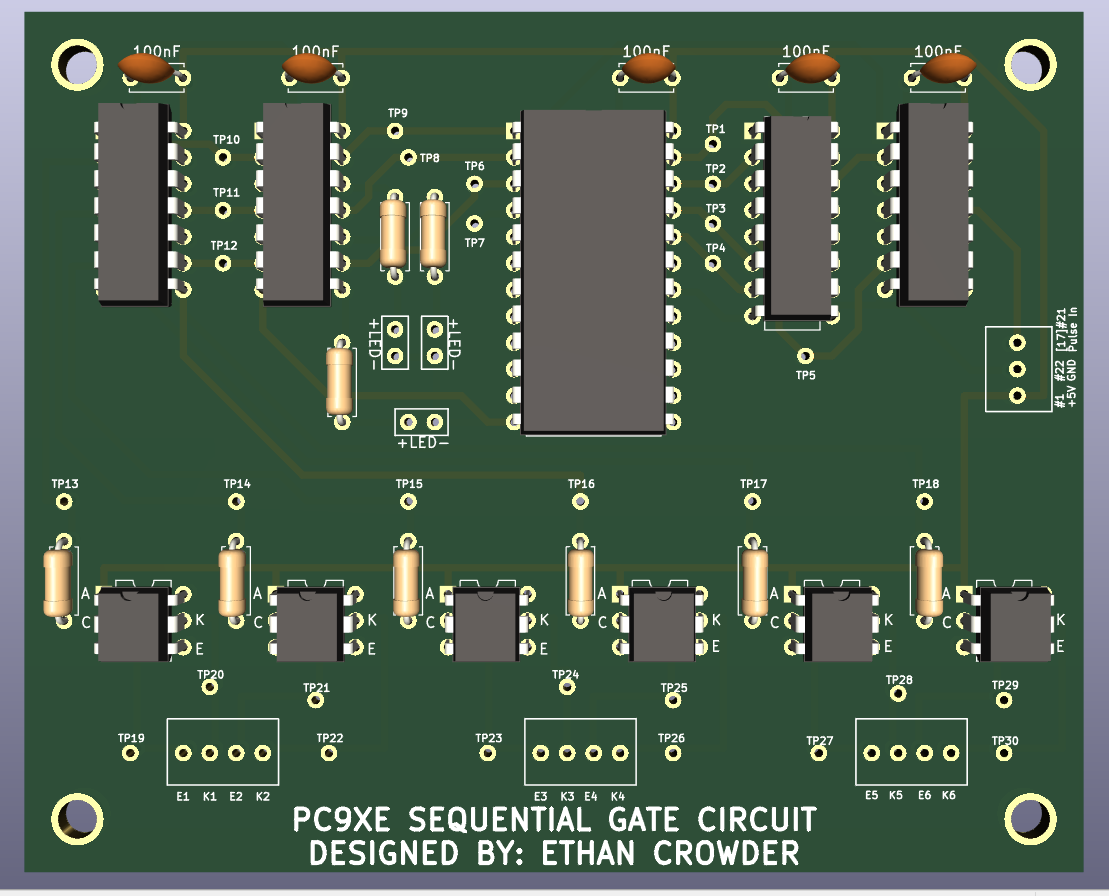
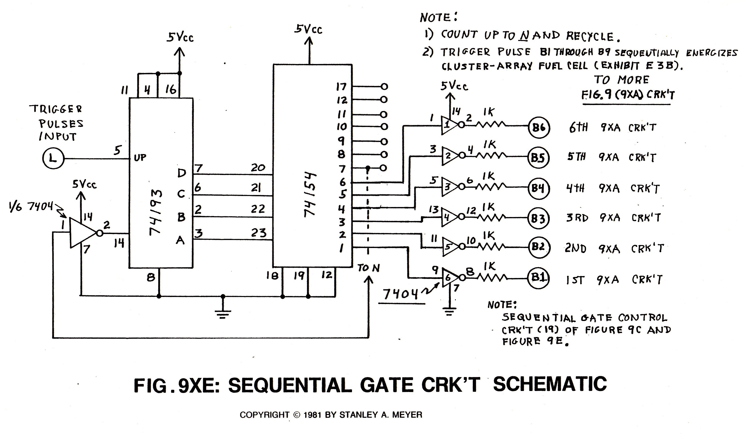
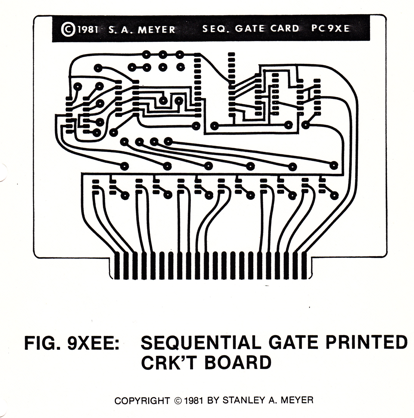
PC9XE - Sequential Gate Circuit
PCB Gerber .ZIP File: PC9XE Gerbers.zip
EPG - Magnetic Spin
This circuit is currently being revised and tested. As of 1-1-26, please do not purchase at this time.
PCB Gerber .ZIP File: EPG Magnetic Spin Gerbers.zip
