
LM317 as a Variable Power Supply: 0-35V Adjustable Voltage
7805 and 7812 Voltage Regulators: Building 5V and 12V Power Supplies
 The
The LM3177805 isand a7812 versatileare popular and reliable voltage regulators used to create stable 5V and 12V outputs, making them ideal for low-power electronics and microcontroller circuits. These voltage regulators are widely used adjustablebecause voltageof regulatortheir thatsimplicity, canefficiency, and capability to provide steady output voltages ranging from 1.25V up to 35V, making it ideal for DIY electronics projects. This regulator can deliver up to 1.5Aregardless of currentinput with proper heat dissipation, making it a convenient solution for powering various circuits with a customizable voltage range.variations. In this article, we will explore how to set up theboth LM3177805 and 7812 voltage regulator circuits, as aillustrated variablein Stanley Meyer's schematic, to create regulated 5V and 12V power supply,supplies.
a
to adjust the output voltage.
How the LM3177805 Worksand 7812 Voltage Regulators Work
The LM3177805 isand a7812 are three-terminal adjustablevoltage regulatorregulators that canprovide fixed output avoltages of 5V and 12V respectively. They are capable of handling input voltages between 7V and 35V for the 7805 and 14V and 35V for the 7812. These regulators output stable voltagevoltages bysuitable regulatingfor thepowering differencemost betweensmall itselectronic inputcircuits. and output. It hasThe three pins:pins on both regulators are:
-
Input (Vin): The input
voltagevoltage,iswhichsuppliedneedshere,totypicallybebetweengreater3Vthan the desired output by at least 2V. -
Ground (GND): The common ground for both the input and
40V.output. -
Output (Vout):
12VThis pin provides theThe regulated output voltage,adjustablefixedbetweenat1.25V5Vandfor themaximum7805inputorvoltage. Adjust (Adj): This pin is used to setfor theoutput voltage through an external resistor network.7812.
TheBoth keyregulators tohave adjustinginternal thecurrent output voltage lies in the resistor network connected between the Outputlimiting and Adjustthermal pins.shutdown Byfeatures, changingwhich themake resistancethem value,reliable theoptions outputfor voltagemost canlow-power beelectronics easily controlled.projects.
Setting Up the LM3177805 and 7812 as a Variable Power SupplySupplies
To create anreliable adjustable5V and 12V power supplysupplies, with the LM317, youyou'll need a few keycomponents components:in addition to the 7805 or 7812 voltage regulators:
-
LM317Step-DownVoltageTransformer:RegulatorA transformer to step down the AC voltage from 110V to around 12V AC for the 7805 or 15V AC for the 7812. -
PotentiometerBridge Rectifier (typicallyB1):5kΩAorfull-wave10kΩ)bridge rectifier to convert the AC voltage to DC. -
FixedFilterResistorCapacitors (C1, C2, C3): These capacitors are used to smooth out the DC voltage after rectification, typically240Ω)1000μF, 35V capacitors. -
Input Capacitor (C4, 0.1μF):
andThisOutputcapacitorCapacitorhelps(1μFstabilizeorthelarger)input voltage to the regulator. -
Heat Sink (
optional,optional):butTorecommendedpreventforthehigherregulatorcurrents)from overheating, especially if the current draw is significant.
Here is how to wire the 7805 or 7812 as a regulated power supply:
-
AC to DC Conversion: Start by connecting the step-down transformer (T3) to the 110V AC input to step down the voltage to 12V AC (for 7805) or 15V AC (for 7812). The AC output is then fed to the full-wave bridge rectifier (B1), which converts the AC into DC voltage.
-
Filtering the DC Voltage: Use the filter capacitors (C1, C2, C3), each rated at 1000μF, 35V, to smooth out the DC voltage. These capacitors help reduce the ripple and ensure a steady DC voltage is provided to the voltage regulator.
-
Voltage Regulation: Connect the output from the filter capacitors to the Vin pin of the 7805 or 7812. Add an input capacitor (C4, 0.1μF) between the Vin pin and ground to stabilize the input. The GND pin is connected to the common ground, and the Vout pin provides the regulated 5V (for 7805) or 12V (for 7812) output.
-
Output Filtering: To ensure a stable output, you can add a small capacitor (typically 0.1μF) between the Vout pin and ground. This helps filter out any high-frequency noise.
Practical Considerations
-
Heat Dissipation: When there is a large difference between the input voltage and the regulated output (e.g., 15V input to 12V output), the regulator will dissipate excess energy as heat. To prevent overheating, attach a heat sink to the regulator.
-
Current Capability: Both the 7805 and 7812 can supply up to 1A of current, but this depends on the input voltage and the ability to dissipate heat. If the current requirement is higher, consider using a switching regulator or adding a more efficient cooling solution.
-
Input Voltage: Ensure that the input voltage is at least 2V higher than the desired output. For the 5V output, the input should be at least 7V, and for the 12V output, the input should be at least 14V to maintain proper regulation.
Using the 7805 or 7812 in a Project Box
To create practical 5V or 12V power supplies, you can mount the 7805 or 7812 circuit in a project box. Add an external on/off switch, input and output terminals, and consider adding a fuse on the input for safety. This can provide a versatile power source for your electronics projects.
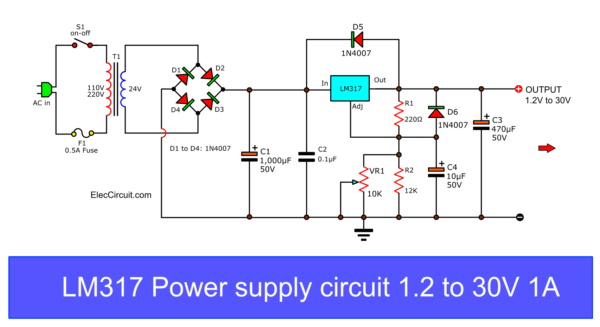
LM317 as a Variable Power Supply
The LM317 is another popular voltage regulator that can be used to create a variable power supply with an adjustable output ranging from 1.25V to 35V. This makes it suitable for projects requiring a flexible voltage source.
To wire the LM317 as a variable power supply:supply, follow these steps:
-
Input Voltage: Connect the input voltage source (e.g., 12V-40V
DC)DC) to the Vin pin of theLM317.LM317. A 0.1μF capacitor can be added between the input and ground to stabilize the input voltage. -
Output Voltage: Connect the Vout pin to the positive terminal of your load. Add a 1μF capacitor between the output and ground to improve stability and reduce ripple.
-
Adjust Pin and Voltage Divider: To control the output voltage, connect a 240Ω resistor between the Vout and Adjust pins. Then, connect a potentiometer (typically 5kΩ or
10kΩ)10kΩ) between the Adjust pin and ground. The potentiometer acts as an adjustable resistor that allows you to vary the voltage.
The output voltage (βVoutβ) iscan be calculated byusing the following formula:
$$ V_{out}Vout = 1.25V \times× \left( (1 + \frac{R_2}{R_1}R2 \right)/ R1) + I_{adj}Iadj \times× R_2 $$R2
Where:
-
R1 is the fixed resistor (typically
240Ω)240Ω). -
R2 is the resistance of the potentiometer, which varies as you adjust it.
-
Iadj is a small adjustment current (typically ignored for most practical purposes).
By adjusting the potentiometer, the ratio of R2 to R1 changes, allowing you to vary the output voltage between approximately 1.25V and 35V, depending on the input voltage.
Practical Considerations
Heat Dissipation: The LM317 can get quite hot, especially when supplying higher currents or when the input-output voltage differential is high. To prevent overheating, it is recommended to attach aheat sinkto the regulator.Capacitor Placement: Placing a capacitor between the input and ground and one between the output and ground helps to filter out noise and reduce voltage ripple, resulting in a more stable output.Input Voltage: To achieve a higher output voltage, make sure that your input voltage is sufficiently higher than the desired output. The LM317 requires at least3Vabove the desired output voltage to regulate correctly.
Using the LM317 in a Project Box
To make a practical adjustable power supply, you can mount the LM317 and the associated components inside a project box. You can add an external potentiometer to the box, which allows you to adjust the voltage easily. Include input and output terminals, and an on/off switch for added convenience. A volt meter module can also be added to display the output voltage in real time.
Conclusion
The 7805, 7812, and LM317 isvoltage regulators are easy and reliable solutions for creating regulated power supplies. Whether you need a versatilefixed component5V foror building12V output or a variable poweroutput supply, allowing you to easily adjustusing the outputLM317, voltagethese fromcomponents 1.25Voffer tosimple 35V.setups By using a potentiometer in combination with a fixed resistor, you can fine-tune the output voltage to suit the needs of your project. With proper heat dissipation and careful setup, the LM317 can provide a stable and adjustable power sourcesuitable for a wide range of electronic applications. The addition of heat sinks and careful consideration of input voltages ensure that the regulators operate effectively without overheating. These power supply designs are versatile and can be used to power anything from microcontrollers to sensors, providing stable sources for your DIY electronics projects.
Source: https://www.eleccircuit.com/lm317-power-supply/#Elec_Circuit_vol1