
ESP32 - Complex Waveform Generator V2
Setting Up The App
ESP32 Complex Waveform Generator - Arrangement for WROOM-32 or WROVER-E (DevKit-C)
PARTS Required
- 1 - ESP32 (WROOM-32 or WROVER-32) with 16 exposed pins
- 1 - ESP32 Breakout Board or equivalent pin header block
- 7 - Rotary Encoders (i.e. KY-040 Rotary Encoder Module CYT1062)
- TODO: add >= 2 more for Elongation adjustments.
- 1 - +5VREG 1A Power Supply for ESP32 (i.e. ATX PowerSupply)
Installation Prerequisites
Install ESP Libraries in Arduino-IDE v2.0
ArduinoJson
ESP32Encoder
Step 1. Open Esp32Full.ino and set Wifi Credentials
// #### Change Me - Local Wifi Info ####
const char *SSID = "NETGEAR";
const char *PWD = "12345678";
Step 2. Configure free local LAN IP address
Check your Router for more information
// #### CHANGE ME ####
// Set your Static IP address to a free IP in your local network
IPAddress local_IP(192, 168, 1, 8);
// Set your Gateway IP address
IPAddress gateway(192, 168, 1, 1);

IPAddress subnet(255, 255, 255, 0);
IPAddress primaryDNS(8, 8, 8, 8);   //optional
IPAddress secondaryDNS(8, 8, 4, 4); //optional
Step 3. Configure ESP_HOST in Javascript File
Edit `./assets/espwavegen.js` and set the IP address used in Step 2 above.
TODO: Make configurable in the web interface
Save and close the file
Step 3. Upload The code in `Esp32Full.ino`
Paste the code into your Arduino-IDE and upload it to your ESP32
Installing the ESP32 Board in Arduino IDE
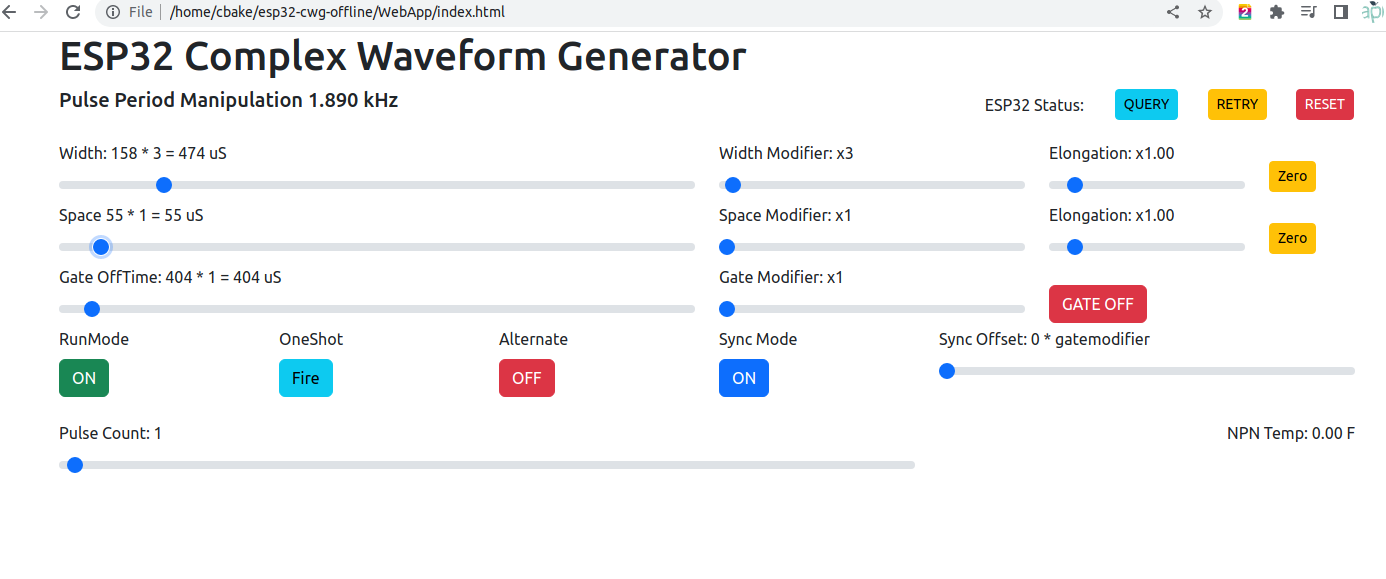
Step 4. Access the WebApp in your Web Browser
Open Web Browser
Open `index.html` in the `WebApp` directory below this file
- File -> Open -> Browse to WebApp/index.html -> Open
Interface is now displayed!
Step 5: Enjoy!!
Please post pics and videos of your waves, and let others know how achievable this is!
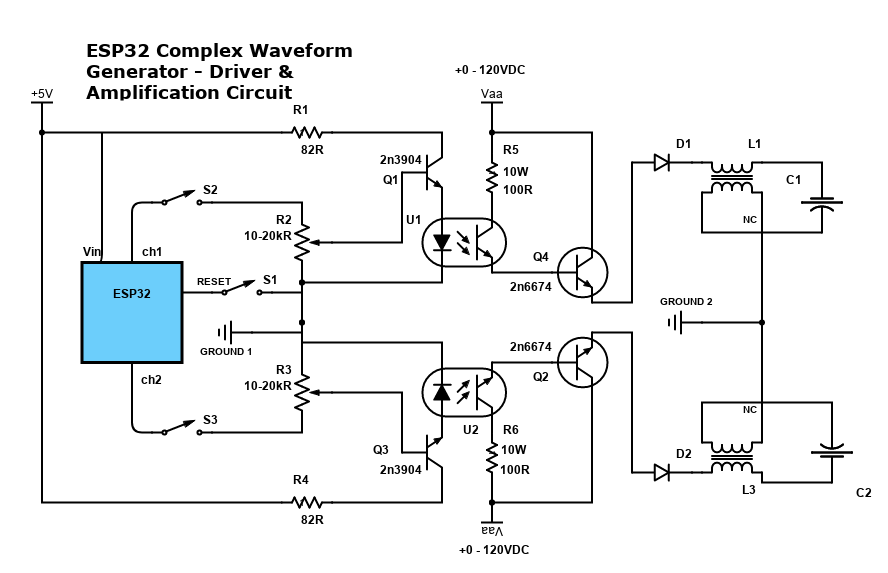
Need Amplification?
See: ESP32 - Complex Waveform Generator - Driver & Amplification
Additional Troubleshooting / Customization
Optional: Configure alternate Output Pins
- Output will be on Pins D2 and D4 by default
// #### Output Pins ####
int pinChannel1 = 2;
int pinChannel2 = 4;
Optional: Adjust Encoder Pins if needed
int pulseCount_EncoderPIN1 = 14;
int pulseCount_EncoderPIN2 = 13;
int pulseWidth_EncoderPIN1 = 35;
int pulseWidth_EncoderPIN2 = 34;
int pulseSpace_EncoderPIN1 = 19;
int pulseSpace_EncoderPIN2 = 18;
int gate_freq_EncoderPIN1 = 22;
int gate_freq_EncoderPIN2 = 23;

int pulseWidthModifier_EncoderPIN1 = 27;
int pulseWidthModifier_EncoderPIN2 = 26;
int pulseSpaceModifier_EncoderPIN1 = 5;
int pulseSpaceModifier_EncoderPIN2 = 32;
int gateModifier_EncoderPIN1 = 25;
int gateModifier_EncoderPIN2 = 33;
ESP C+ Code
Git Repo: https://bitbucket.org/cbake6807/esp32-complex-waveform-generator/src/master/
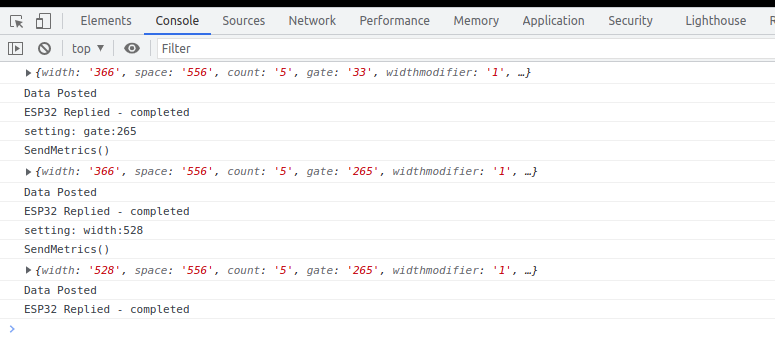
Troubleshooting:
View the Console Log for errors in your browser while clicking the app's sliders buttons etc..
Look in the Network tab for red errors. 404 or other. Sometimes the ESP may drop or reject the connection on the first attempt. Just refresh the browser once or twice and it should resolve.
Confirm the ESP is a connected host in your network and was given the IP you specified
https://www.wikihow.com/See-Who-Is-Connected-to-Your-Wireless-Network
Code notes if internet connectivity isn't an option. Also, encoder wiring connections for this particular setup (Notepad++ document file type). Chris Bake ESP32 notes.txt
Notepad++ download: Notepad++